
The Nikon LS-1000 Super Coolscan is a SCSI film scanner capable of scanning from both slides (positive images) and color negatives. Both PC and Mac software is supplied with the scanner.
The LS-1000 is a second-generation product. Like its predecessor, the LS-10 Coolscan, the LS-1000 uses solid-state illumination: red, green, and (yes!) blue LEDs are used to light the film. The use of solid-state illumination results in better color stability and less heat output than other film scanners.
Image focusing and scan speed were the major headaches reported by users of the older LS-10 film scanner. The LS-1000 includes a very capable autofocus function, and image scan speed has been improved greatly. Assuming enough physical memory and SCSI bandwidth is available, a full-resolution (3888x2592) scan takes less than a minute. I'd emphasize that lots of memory is required to achieve these speeds; I tried a full-resolution scan on a PC with 40M of available RAM, and it spent a lot of time swapping. For images of more reasonable size, however, the LS-1000 is really quite fast.
The scanner detects twelve bits of color data in the red, green, and blue channels. Since every computer system that I've ever used has a video system which maintains 24 bits of color information at most, some information must be discarded. A set of translation curves is used to map 36-bit color onto 24-bit color; in this way, you can choose whether to maintain shadow detail, highlight detail, or compress the dynamic range of the image a bit in order to retain as much as possible of both.
Also available from Nikon is the LS-4500, which can handle larger film sizes (up to 4"x5").
Here are a couple of images scanned with the Nikon LS-1000 Super Coolscan 35mm slide/film scanner. They aren't masterpieces by any means; I chose them because they have characteristics that demonstrate the capabilities of the film scanner effectively.
If you're not very familiar with color depth, monitor gamma and the effect these factors have on Web-delivered imagery, you'll probably want to take a moment to read this brief introduction so you can properly interpret the sample images.
 Here's another scan from the same image; this one was done at full scanner resolution
(1350dpi). Again, remember that the image on this page is a reduced version; click on the
thumbnail image for the full-sized version. Some film grain is apparent in this scan,
which gives you some idea of the scanner's ability to resolve fine detail. At this
magnification, it's also possible to see some of the chromatic aberration introduced by
the consumer-grade zoom lens I was using at the time (Canon 28-80mm EF F3.5-4.5); you can
see a little red color fringing around the sweater Holly is wearing. To put all of this in
proper perspective, Holly's face spans an area less than 1.5mm wide on the actual film;
you'd never see these problems at more normal magnifications.
Here's another scan from the same image; this one was done at full scanner resolution
(1350dpi). Again, remember that the image on this page is a reduced version; click on the
thumbnail image for the full-sized version. Some film grain is apparent in this scan,
which gives you some idea of the scanner's ability to resolve fine detail. At this
magnification, it's also possible to see some of the chromatic aberration introduced by
the consumer-grade zoom lens I was using at the time (Canon 28-80mm EF F3.5-4.5); you can
see a little red color fringing around the sweater Holly is wearing. To put all of this in
proper perspective, Holly's face spans an area less than 1.5mm wide on the actual film;
you'd never see these problems at more normal magnifications. 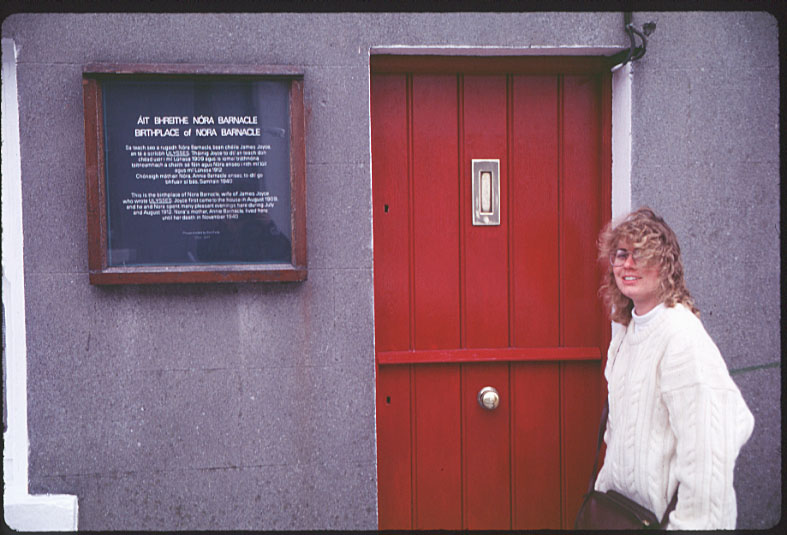 This is another image taken from a slide. Note the color saturation, as well as the
highlight and shadow detail visible in the full-sized version of this thumbnail image.
This is another image taken from a slide. Note the color saturation, as well as the
highlight and shadow detail visible in the full-sized version of this thumbnail image. Click on the thumbnail image at right to see some detail from this image at the scanner's
full 2700dpi resolution.
Click on the thumbnail image at right to see some detail from this image at the scanner's
full 2700dpi resolution.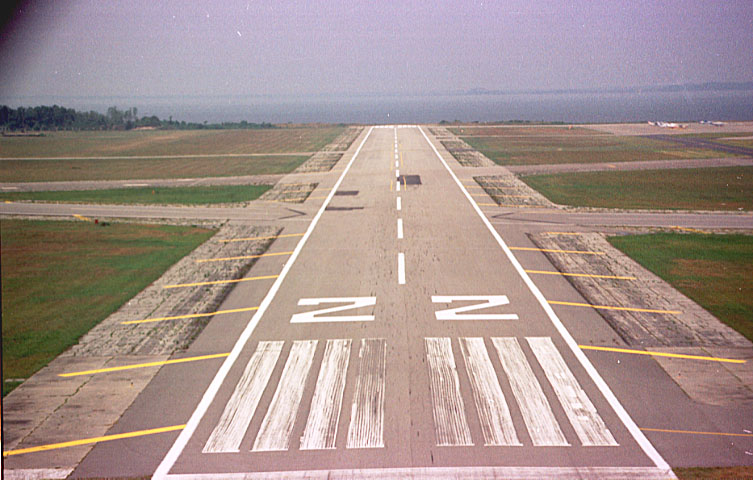 This photo was taken on some no-name ISO 100 color negative film. The color shift at the
edges of the film is pretty typical of short-dated no-name film; in addition to this
problem, the negative strip was pretty badly curled. (The dark spot in the upper left is
not a film problem; it's part of the aircraft's propeller. There are also a few dust spots
which I could have gotten rid of had I cleaned the negative more thoroughly before
scanning it.)
This photo was taken on some no-name ISO 100 color negative film. The color shift at the
edges of the film is pretty typical of short-dated no-name film; in addition to this
problem, the negative strip was pretty badly curled. (The dark spot in the upper left is
not a film problem; it's part of the aircraft's propeller. There are also a few dust spots
which I could have gotten rid of had I cleaned the negative more thoroughly before
scanning it.)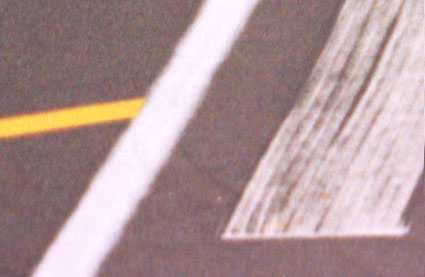 This is a section taken from the lower left-hand portion of the image. The autofocus point
was left on the center of the frame (well outside the visible area here); due to the
glassless negative carrier and extreme curl of this particular negative, you can see some
blurriness in the enlarged version.
This is a section taken from the lower left-hand portion of the image. The autofocus point
was left on the center of the frame (well outside the visible area here); due to the
glassless negative carrier and extreme curl of this particular negative, you can see some
blurriness in the enlarged version. 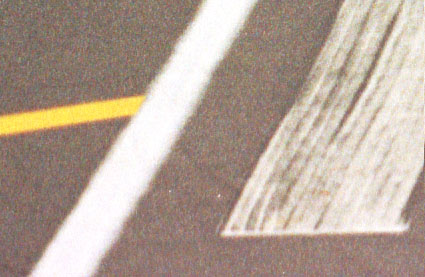 This is the same image section, but the autofocus point was placed in the center of the
area visible here. Film grain is clearly visible in the enlarged version. Due to the color
shift in this region, the scanner has altered the default color balance to compensate. I
actually think it overcompensated a bit; fortunately, it's very easy to override focus and
color balance settings manually should the need arise.
This is the same image section, but the autofocus point was placed in the center of the
area visible here. Film grain is clearly visible in the enlarged version. Due to the color
shift in this region, the scanner has altered the default color balance to compensate. I
actually think it overcompensated a bit; fortunately, it's very easy to override focus and
color balance settings manually should the need arise.As you can see, the glassless negative carrier can cause some problems if your film really doesn't want to stay flat. This isn't a big problem by any means, however; I chose the most badly-curled negative I could find to illustrate the problem.
In short, the Nikon LS-1000 really delivers on its promise of high-quality desktop scanning; it's a good choice for users who need more control (or faster turnaround) than is available with Photo CD.